"Cedar Ball Permanent Blinds"
by Tom Bax
(Official Crow Guide for the B&K Hunting Club)
Equipment
Chainsaw and/or handsaw Several feet of woven fence wire Several long 2x2 or 2x4 boards Roll of smooth tying wire Pliers Heavy wire cutters Sledge hammer Leather gloves (optional) Wood post(s) (if necessary) Seats
Blind Description
 These blinds have two basic models; the stand-up and the sit-down. Both models may have seats but the stand-up is usually taller than the sit-down to allow for movement. Both can be made in various shapes but the stand-up is normally square and the sit-down is normally rectangular. The stand-up model is normally wide which forces the hunters to walk from one side to the other to cover all the directions when it's not at full capacity. Its biggest advantage is freedom of movement. When it's full, hunter's will be sitting in positions that cover each other's blind spot. When a hunter 1 sees a bird coming in hunter 2's blind spot, hunter 2 will whisper to hunter 1 and hunter 1 can move into position. This 'turning to shoot' is almost impossible ina sit-down and is normally not needed. The sit-down model is normally long and narrow. The length will determine the number of hunters that can use the blind. Seats will be placed in alternating positions in this blind which means the longer the blind the harder it is to get to the farthest seat. In a four-man blind that runs east and west, hunter 1 will face north, hunter 2 south, hunter 3 north and hunter 4 south. Hunters will normally remain seated while shooting which means they are sitting side-by-side with their shell boxes in front of their feet. With this arrangement, the only necessary movement should be raising the shotgun. You can build either of these blinds in various sizes to support multiple hunters. You can make one too big. The smallest blind we've made was a two-man sit-down model and the largest was a stand-up model for twelve hunters. We tried squeezing four hunters in a two-man model and still had a good, but cramped, hunt. When we tried out our biggest model, the most hunters we had at the time was eight. The hunters made too much movement trying to cover each. Between the two types, I've had more fun and better hunts using the sit-down model. The rest of this article with be about building a two-man sit-down model but that doesn't mean the information won't work for a stand-up. You just have to alter the size according the description above and use only one or two roof holes. These blinds have two basic models; the stand-up and the sit-down. Both models may have seats but the stand-up is usually taller than the sit-down to allow for movement. Both can be made in various shapes but the stand-up is normally square and the sit-down is normally rectangular. The stand-up model is normally wide which forces the hunters to walk from one side to the other to cover all the directions when it's not at full capacity. Its biggest advantage is freedom of movement. When it's full, hunter's will be sitting in positions that cover each other's blind spot. When a hunter 1 sees a bird coming in hunter 2's blind spot, hunter 2 will whisper to hunter 1 and hunter 1 can move into position. This 'turning to shoot' is almost impossible ina sit-down and is normally not needed. The sit-down model is normally long and narrow. The length will determine the number of hunters that can use the blind. Seats will be placed in alternating positions in this blind which means the longer the blind the harder it is to get to the farthest seat. In a four-man blind that runs east and west, hunter 1 will face north, hunter 2 south, hunter 3 north and hunter 4 south. Hunters will normally remain seated while shooting which means they are sitting side-by-side with their shell boxes in front of their feet. With this arrangement, the only necessary movement should be raising the shotgun. You can build either of these blinds in various sizes to support multiple hunters. You can make one too big. The smallest blind we've made was a two-man sit-down model and the largest was a stand-up model for twelve hunters. We tried squeezing four hunters in a two-man model and still had a good, but cramped, hunt. When we tried out our biggest model, the most hunters we had at the time was eight. The hunters made too much movement trying to cover each. Between the two types, I've had more fun and better hunts using the sit-down model. The rest of this article with be about building a two-man sit-down model but that doesn't mean the information won't work for a stand-up. You just have to alter the size according the description above and use only one or two roof holes.
Site Criteria
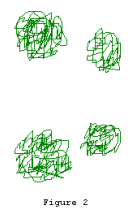
You will looking for four cedar trees that will form the four corners of your blind. The distance that they are apart will determine the size of your blind. The farther the cedars are apart the more lumber and materials you will need. Try to find 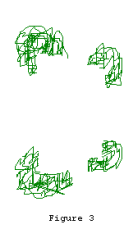 ones that will form a narrow rectangle. Figure 2 shows an overhead look at four cedars that are shaped more like a trapezoid. This will also work. The blind doesn't have to have all four corners made of "live" cedar. If three cedars are close enough together to make a blind, cut a fourth cedar and trim off limbs to make a corner pole. If you have only one "live" cedar that fits your needs, cut three cedar corner poles. If you're not allowed to cut down any cedars, you will have to use posts for your other corners. ones that will form a narrow rectangle. Figure 2 shows an overhead look at four cedars that are shaped more like a trapezoid. This will also work. The blind doesn't have to have all four corners made of "live" cedar. If three cedars are close enough together to make a blind, cut a fourth cedar and trim off limbs to make a corner pole. If you have only one "live" cedar that fits your needs, cut three cedar corner poles. If you're not allowed to cut down any cedars, you will have to use posts for your other corners.
Stand Construction
Step 1. Trim away the limbs of each cedar that would be growing toward the inside of the blind. See Figure 3. Cut these limbs off next to the trunk of the tree and stack them aside. They will be used later.
Step 2. Cut the top off of the trees approximately three feet above the head of the tallest hunter WHILE HE IS SITTING on his seat. Guess long at first. More can always be sawed off later if it blocks too much of the hunters' view from the "roof" hole.
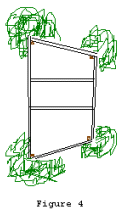
Step 3. Cut four boards to create the outside pieces of the frame shown in Figure 4. Nail the these boards to the sides of the trunk with the top edge of the board one foot down from the top of the tree trunk. USE ONE NAIL ON EACH END OF THE BOARD.
 Step 4. Put the seats inside and sit in them. Sit in each one to see of the "roof" line is going to interfere with shooting. Pull the board off of the trunk and move it up or down to fix the problem. REMEMBER, the higher you raise the "roof" the easier it is for the crows to see you. Step 4. Put the seats inside and sit in them. Sit in each one to see of the "roof" line is going to interfere with shooting. Pull the board off of the trunk and move it up or down to fix the problem. REMEMBER, the higher you raise the "roof" the easier it is for the crows to see you.
Step 5. Finish nailing the boards to the trunks. Cut the pieces that go in the middle of the frame and nail them in the center about 20 inches apart. TIP: Hold the sledge hammer head against the opposite end of the middle boards while driving the nails in the other end. It will be easier to drive the nail.
Step 6. Cut two sections of the woven wire approximately two foot longer than the "roof" and put them on the "roof" with equal amounts of the wire hanging over both ends.
Step 7. Wrap the ends of the woven wire around the board and tie it to the "roof" wires. Use the smooth wire to tighten and tie the sides and middle of the wire. This reduces any "banging" noises when the weather is windy.
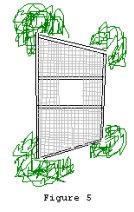
Step 8. Cut a hole in the center of the wire between the middle boards about 20 inches square. Fold the wire ends inward so no sharp ends are around the edge of the hole. This will stop hands, wrists, and guns from being scratched easily. See Figure 5.
Step 9. Take the limbs that were cut from the trees and put them on the roof. Don't put limbs on the roof that have a base bigger than 2 inches. Trim the larger limbs and use the pieces on the "roof". This will remove the excess weight.
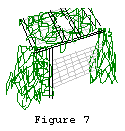
 Step 10. Decide which wide side of the blind that you want the entrance on. Cut a piece of lumber 1 foot longer than the distance from the ground to the "roof". Drive it in the ground behind the limbs of the left or right tree. The limbs will cover the opening from view. The left side was used in Figure 7. Step 10. Decide which wide side of the blind that you want the entrance on. Cut a piece of lumber 1 foot longer than the distance from the ground to the "roof". Drive it in the ground behind the limbs of the left or right tree. The limbs will cover the opening from view. The left side was used in Figure 7.
Step 11. Tie the end of the roll of woven wire around the entrance pole. The top of the wire should be even with the top of the hunter's head when he's seated. It can be hung lower than that but don't put it below chin level. Nail the wire to the pole so it won't slide down.
Step 12. Roll the woven wire from tree to tree. Pull the wire hand tight as it's being nailed to the tree. Never wrap ANY wire around a tree. It will kill the tree and ruin the blind.
Step 13. Weave the butt end of many cedar limbs into the woven wire on the sides of the blind, preferably with the butt end down. Fill in the wire openings so the crow can't easily see through it. If you run out of limbs you will have to cut more. Trim limbs from cedars that aren't close to the blind.
Step 14. At the bottom of the sides put dead cedar limbs and stuff leaves into the dead limbs. This will cover the butt ends of the bottom limbs on the sides and keep the crows from seeing the hunters' feet. See Figure 8.
Construction Tips
 The door in the example above was put on the side with the shorter of the two long walls. For the two-man blind 2x2 material will work ok. When you get bigger than that, the outside from should be 2x4. The center two pieces should always be 2x2. For larger blinds you will need more center pieces because you will need to cut a hole in the roof between each hunter. Try to use rusty woven wire. Find someone tearing down an old fence. They'll probably give you the wire to get rid of it, especially if you help tear down the fence. There is no reason to lower the side wire below the eyes. Crows are in the air not on the ground, so you will be looking up not down. If you must have it below the eyes, don't go below the chin. If you don't want to use cedar limbs for the top and sides, you can tie camo cloth to the wire. I don't use it because the wind ripples it and it doesn't always "weather" very well. Definitely, don't put in on the same day you're hunting. Don't cover the "roof" too well. You must be able to watch the crows through it without letting them see your eyes too clearly. The door in the example above was put on the side with the shorter of the two long walls. For the two-man blind 2x2 material will work ok. When you get bigger than that, the outside from should be 2x4. The center two pieces should always be 2x2. For larger blinds you will need more center pieces because you will need to cut a hole in the roof between each hunter. Try to use rusty woven wire. Find someone tearing down an old fence. They'll probably give you the wire to get rid of it, especially if you help tear down the fence. There is no reason to lower the side wire below the eyes. Crows are in the air not on the ground, so you will be looking up not down. If you must have it below the eyes, don't go below the chin. If you don't want to use cedar limbs for the top and sides, you can tie camo cloth to the wire. I don't use it because the wind ripples it and it doesn't always "weather" very well. Definitely, don't put in on the same day you're hunting. Don't cover the "roof" too well. You must be able to watch the crows through it without letting them see your eyes too clearly.
Shooting Tips
MAKE SURE THE MUZZLE OFF THE SHOTGUN IS OUTSIDE THE BLIND BEFORE YOU PULL THE TRIGGER. You WILL hurt someone's ears if you don't. There is only one proper way to put the seats in 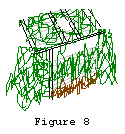 a sit-down blind. The hunter on the entrance end of the blind will have his seat positioned so his back is towards the opening. The seats will alternate left and right as you walk farther into the blind. Never lay your gun across your lap. Put the butt of the gun on the ground between the heals of your feet. Your shells will be up in front of your toes and you'll have plenty of time to raise the gun. The holes in the "roof" are for one hunter to cover the other when they miss a crow flying in from the end of the blind. With the two-man blind, the hole is seldom used but comes in handy overhead circlers. a sit-down blind. The hunter on the entrance end of the blind will have his seat positioned so his back is towards the opening. The seats will alternate left and right as you walk farther into the blind. Never lay your gun across your lap. Put the butt of the gun on the ground between the heals of your feet. Your shells will be up in front of your toes and you'll have plenty of time to raise the gun. The holes in the "roof" are for one hunter to cover the other when they miss a crow flying in from the end of the blind. With the two-man blind, the hole is seldom used but comes in handy overhead circlers.
Miscellaneous Tips
Don't get to far off of the top of the hill. The ground will slope too much for the hunters' seats. Blocks of wood make the best seats. They don't squeak and they're not as cold as metal seats. The cedar limbs will need to be replaced each year. I normally replace the limbs about a month before season starts. By the end of the season, the limbs will be brittle and dry but still green. Bring a black trash bag or waterproof pad to sit on if snow has melted from the "roof". The blocks of wood will take quite a while to dry. Do NOT put decoys on top of the blind. If you do, when the crows are watching the decoys and they will see your gun movement. I use the normal tactics for crow placement but put the call box inside with me and have the speaker outside on the highest limb.
|

 Advanced Articles