| Home | Back |
 |
 |
|
Fitting Your Own Shotgun The purpose of this article is to address the What, How, and most importantly,Whys of fitting a bone stock shotgun to the shooter. The goal is a gun that shoots where you look, as a natural extension of the body. Why do it? The North American wing shooter is an anomaly in the world of wing shooting. This is the only place in the world where it is considered acceptable to walk into a store, buy a shotgun, and "learn" to shoot it. It just proves how adaptable we can be, as many are good wing shooters, with these "off the rack" guns. I have known accomplished shooters who absolutely refused to alter their guns, based upon the belief that if there gun should break, they could just borrow another like, unmodified, gun. There is always the guy, who is a good wing shooter, who says, "BS, I don’t need a custom stock and neither do you; no body needs that; it’s a waist of money". The fact is a fitted stock will make a good shooter, a better shooter, and maybe even a great shooter. It will also shorten the time it takes for the beginner to start connecting on a regular basis. It will most assuredly save you in an off balance or surprise situation. If you think the shotgun fits you, try this little test. Make sure the gun is empty. Stand in the ready position. Close your eyes…no peaking, and mount the gun. Now open your eyes. What do you see? We are going to fix that, and yes, it needs fixing. The best part is You can fix it, with a little help. It’s impossible to address the fit of a shotgun without addressing the intended use, the proper way to shoulder the gun, and the proper way to swing the gun. Generally speaking, when we talk about fit we are talking about the stock. The English are the masters of fitting field stocks. The Italians are the masters of fitting Trap and Live Pigeon stocks. The Americans are the Masters of Skeet stocks. You are going to be the master of fitting your stock. The stock is the foundation of the gun and is the means of positioning the shooting eye. Remington sells three types of stocks, in one size to fit all. We have a "skeet" stock; a "Trap" stock; a "field" stock; and "Youth" stock. These stocks come in a one size fits all. To make it worse, the current rage is synthetic stocks making alteration very difficult. Imagine going to a clothing store to buy a pair of jeans and finding three styles, all in one size, with no alterations available. Handling the Gun
Watch a major league shortstop or a tennis player. Their head is erect, slightly forward, and level. They are bent slightly at the waist and the knees. Their weight is on the balls of their feet. The guy down at the local watering hole is in the same position right before he pops some other guy for hitting on his date. This is the natural ready position of our species. This should be our position when we shoot. The butt of the stock should rest on the muscle under the collarbone and the head should fall naturally on the stock with the eye aligned with the sights. The arms should feel natural and not pressed under the gun or in the air like a pair of wings. If the body is facing 12:00, the gun should be pointing at 11:00 if right handed and 1:00 if left handed. Once the gun is mounted, nothing above the waist should move except the eyeballs. Bending at the waist moves the gun up and down. Swing the gun with the legs, not the arms or upper body. The Gun points where you look. It’s part of the body, like the nose on your face. The eyes may disconnect to acquire a target, but the head, gun, and upper body will rotate to catch up. Everything is locked in as a single unit. This is why shooting while sitting down, kneeling, or laying down, needs to be avoided whenever possible. Part of what we are doing addresses mounting the gun. To aid this we need to address clothing. No we are not going to hunt in a sporting clay vest over a tee shirt. We need to be cognizant of what we wear. Avoid button down flap pockets on the gun side. Avoid jackets and coats that don’t have a clearable path between your waist and your shoulder. Length No, we are not going to lay the gun on the inside forearm, with the butt in the crook of the elbow, and our finger on the trigger. Stock length has more to do with the length of the neck and the shape of the head than the length of the arm. If the stock is too long it causes multiple problems. The body compensates for a long stock one of three ways. It will accept it in the normal position but the face will be on the combing at the thickest part of the stock, back by the heel and the head must be canted, (twisted), to get the eye in line with the rib. The gun may be canted, instead of the head, causing other problems. Usually the eye is below the sight plain as well, causing the shooter to lift their head to see the front sight. More common, is the gun facing 9:30 or 10:00 while the body is facing 12:00, and the butt is out on the shoulder bone or even the arm, and crosses the body. The head is thrust forward and the neck is twisted to put the cheek on the comb. Shooting is across the body. Another common compensation has the butt mounted lower on the chest and the shooter is laid out over the gun with the neck stuck out like a turtle and the head cranked back peering out from under the eyebrows. This is called crawling the stock. The shooter with a long stock also needs to reach further away from the body, reducing leverage, and control of the gun. There are also issues with mounting the gun as a long stock requires the gun to be brought up with hands further away from the body in an up, out, and in move and it must clear the added clothes when it gets cold. With a stock that is too short, the shooters face will be in contact with the hand holding the pistol grip, and over, or at, the end of the comb. One of the greatest skeet shooters, Dick Shaughnessy, shot a short stock and jammed his face into his hand and the comb on every target. This was how he "locked into the gun" He was the first person to shoot a 100 x 100 with a .410. The butt angle for a field gun is not so critical. We want the face of the pad we are going to add, to be perpendicular to the sight plain, avoiding the issue of the point of the butt digging or catching. The rubber recoil pad serves two purposes. The rubber face will grip the shoulder and keep the butt, (foundation), planted, between shots and It will reduce felt recoil with thin clothes. We are going to do the length and the angle of the butt at the same time. You will need a roll of masking tape, a wall mirror, your heavy hunting clothes, a tape measure, and the gun. Check the gun and make sure it’s empty. Take the butt plate off the gun. Take a piece of tape, an inch long, and store it on the side of the action someplace. Dress the upper body like you will on the coldest day of the year. I hope during the last discussions, you have had the gun to the shoulder and have been evaluating how you hold the gun. With the action open, mount the gun and point it at yourself in the mirror. Do it a couple of times. Put it to the shoulder like you would in the field. Now do it one more time and hold it there, reach up and take the piece of tape and mark where the end of your nose is on the top of the stock, fore and aft. Now measure the distance from the tape, (the end of your nose), to the front of the comb, where it starts to drop off into the valley of the pistol grip. Also measure from the front of the trigger to the butt in the center of the stock. On the finished stock, with the recoil pad installed, we want the tip of your nose to be no more than 1" back from the end of the comb. Okay now we need to do some simple math. Lets say your nose was 2" back from the comb and the stock is currently 14" The pad is 3/4". A plan to have the nose 3/4" back would require the finished length to be 1 1/4" shorter than it currently is, or 12 3/4". Now the pad is 3/4" so the cut will be at 12", measured from the face of the trigger to the center of the butt. Lets say the nose was 1/4" past the end of the comb. To get the nose back, 3/4", where it belongs, the finished stock needs to be I" longer than it currently is. I would now chose a 1 1/8" pad, allowing a 1/8" finish cut to remove the factory contoured cut. Do the same thing with your spring / fall shooting attire. This will indicate what size spacers you might need to make, and add, in the warmer weather. I set my nose at the comb, with just a heavy shirt, and it ends up 3/4" back, with heavy clothes... no spacers. My guns are 13,1/8" over the pads. In fact, a youth stock at 13" fits just fine. The cut will be perpendicular, square, at right angle to, the top of the receiver, so the stock cut needs to be taped off appropriately. We want the opened wood from the cut treated with some sort of wood sealer or varnish. Who knows where the butt of this gun will be and if it’s four inches under water, we don’t want the stock to take water and swell. With the stock taped off, its ready to go to the gunsmith to be cut and the pad added. Be sure he knows the final length, you want over the pad, measured at the centerline of the stock. Sights and why they are Important The sights are the most neglected part of the typical shotgun. Remington can get away with throwing a metal ball on the end of the Rib, and the American shooter accepts it because "everyone knows you don’t aim a shot gun". BALONEY!!! Of course, you aim a shotgun. It’s not aimed like a rifle, but it is most assuredly aimed. We will cover this in depth later. Remington can’t get away with this on a Trap, Skeet, or Sporting Clays gun because the shooter will not accept it. You shouldn’t either. I favor the Bradley White front sight, with a small silver metal mid rib bead, as Remington supplies on their target guns. There are many good sights available but I have been shooting with these sights, in my peripheral vision, all my life, so these are what I recommend. Any honest gunsmith will tell you one of the hardest things to do is mark, drill and tap a rib so the sights are in the EXACT center of the rib. If either or both are the slightest, and I mean the SLIGHTESS bit off, it is visually apparent instantly. If they are not right, have him weld it up and do it again. Do not settle for anything but perfect. Misaligned sights are extremely annoying. So why do we need them? The relationship between the two sights on the rib is how we set, and verify, the position of the rear sight, the shooting eye. The positioning of the shooting eye affects (POI), point of impact. We adjust this with the height of the stock. We are now ready for the most important step in the process. We are going to make the gun shoot where we look! And that’s what this deal is all about. Adjusting Point Of Impact The gun is back from the gunsmith with the stock set to length. It may feel a little funny at first but you will quickly appreciate the modification. The final step in the project is to setup your vertical point of impact, (POI). The POI is the exact center of your pattern. The cold fact is the average shooter doesn’t have a clue where his gun shoots. The number off people I have carried goose hunting is well over a thousand. It was the rare shooter, who could stand up in the blind and wrap a pattern of shot around a cripple on the water. I have seen people miss by as much as 15 feet. Well over 90% of the misses were vertical, high or low. When an experienced wing shooter misses it is usually a vertical error, as well. I have never seen a pump or auto that demonstrated a built in horizontal error. Doubles and O/U… yes, pumps and autos… no. Therefore, we will address the vertical POI only. Go to the local full service drug and ambulatory care store and get two packages of "moleskin". I think it is packaged by Doctor-Scholl’s. It comes precut for all sorts of stuff, but you want it in uncut sheet form. Also, go to the local Athletic store and get a couple rolls of "Trainers Tape". This is a white cloth tape, two inches wide, used to wrap ankles and wrists. Lets see where the shotgun points. Your nose should be in the correct position on the stock, regardless of what you are wearing if you followed the instruction above. With indoor clothing your nose should be very close to the end of the comb. Verify the gun is empty. With the shotgun in the ready position, close your eyes, and mount the gun with your cheek firmly on the stock…NO PEAKING! What do you see? If you are like most people you are looking at the back of the receiver, and cant even see the sights. Too much drop. Do it a couple more times. Keep in mind; the face is at the point of the least amount of drop on the stock, too. Okay, lets build up the stock so we see the sights in this drill. With the trainers tape, cut full width pieces and start taping the stock lengthwise starting an inch back from the comb and ending two inches from the recoil pad. Center the width of the tape on the top of the stock. Add five or six layers of tape and try it again. Keep going until you see the receiver and/or rib as a visual line with just the sight beads sticking up, proud. Lets go to the range Take along the following:
You will also need paper for the pattern board. This will not be a typical patterning session, so left over Christmas wrapping paper or anything about 30 inches wide will be fine. Take a modified or full choke tube, if the gun is a choke tube shotgun. I hope your range has a pattern board. If not, you will have to improvise. Set yourself up as follows: Full choke, set up at 30 yards. We are looking for a 20" pattern here. Adjust the range in the first couple patterns, to get this. Put a 2" aiming dot on the paper with the magic marker. Now take the shotgun, load and shoot a pattern that is perfectly centered on your aiming dot. This isn’t easy, is it? Try again… Do not "hold", or move your point of aim up or down, to center the pattern. Change your head position and look at the sights while you adjust to center the pattern on the dot. Let the mid-rib bead go where it needs to go, but hold that front sight on the target. When you do get the pattern centered, make a mental note of what the sights look like and the relationship between the front and mid-rib sight. Now tape your stock so you see that exact "sight picture" when you mount the gun with your eyes closed. Now load the gun and mount the gun with your eyes closed, open them and shoot a pattern without moving your face on the gun. It should be centered. We have now set up a 50-50 shotgun. 50% of the pattern is above the aiming point and 50% of the pattern is below the aiming point. The POI, point of impact, and the POA, point of aim, are the same. If you are one of the very few who have a stock that is too high, your job will be a little messier, as you will need to rasp and sand your stock down a little at a time. The effort is worth it, either way. Lets talk about POI and POA. With a 50-50 pointing gun, again, half of the pattern is below the POA and half is above. This is not seen as desirable by many live pigeon, trap, and skeet shooters as well as many wing shooters. The issue is when the gun is swung ahead, or held in front of the target the alignment of the eye is directly behind the sights and the barrel. If the target suddenly drops it will many times be visually lost under the gun, without warning. Also on rising, going away targets, and overhead incoming targets, the barrel will cover the target in order to allow forward allowance, losing visual contact with the target at the very instant one wants to see it best. You will read and hear about 90-10, 80-20, 70-30, and 60-40 shotguns. This means, for example, a 70-30 gun will pattern 70% of it’s pattern above the point of aim and 30% of it’s pattern below the point of aim. These are guns that are set up with the POI above the POA. Essentially, one holds the gun below the path of crossing target allowing the target to remain in full view. Trap shooters only shoot rising targets so these are the guns with the most drastic POI offset. Trap guns are set up with adjustable ribs and adjustable stocks, to facilitate these changes. Wing shooters will opt for something between 70-30 and 60-40. At this point you can leave it 50-50 or try a change.
I set up my guns to shoot 65-35. This allows the full profile of the bird to be viewed above the barrel, rather than the top half of the bird as with a 50-50 shotgun. To set this up, continue to build the stock up so the gun throws the 20 inch pattern with 13 inches above the POA and 7 inches below the POA. This will also give the eye a different perspective and more depth perception. The rib will visually appear like a runway or a highway to the target. The mid-rib sight may be at the bottom of the front sight or there may even be a space between them, depending upon the distance between the two, the barrel length and the height of the mid-rib bead. You will not be looking at the sights while you are shooting. They are there to verify your mount and this sight picture. Assuming you have the guns POI where you want it, mount the empty gun a few more times with your eyes closed and then look at the sights. Memorize the sight picture. This is how you will evaluate changes of clothing, stance, and many other conditions. Once you are settled with what you have and have the gun pointing where you are looking, take the moleskin and guess how many strips of tape will equal the thickness. Take enough Tape off the stock to compensate for the moleskin and form the moleskin to cover the tape on the gun. Cut rounded corners and play with the size and shape until you like it. Put it on the stock over the tape. The stock can be shot in this condition forever or you could give it to a stock maker and he could create a work of art for you, in the same dimensions. This may take some more trial and error to get it right. A couple hundred skeet targets, called for, from a low gun position, will begin to demonstrate the fruits of your labors. You will be one of a select few wing shooters in North America with a gun you can mount and shoot without adjusting to the stock. You will be looking at the target and the gun will shoot where you look. There are other adjustments that can be made to further align the eye; affecting handling and balance of the gun, but the items we have covered will deliver the lion’s share of the desired results. I realize many will not directly apply the entire recipe, outlined here. If you can apply any of the techniques described here I have accomplished my mission. It is my sincere hope that everyone who reads this, at least, comes away with a clear understanding of the process and a better understanding of their shotgun. Special thanks to Crow Busters member Ed Davis for the information in this section. |
||
| TOP OF PAGE | BACK | ||
| Copyright (c) 1999. Crow Busters. All rights reserved. |
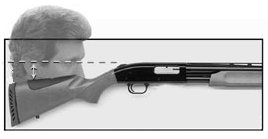 Before the screaming starts about changing the way you shoot, hear me out and think about what I am saying. Most have learned how to shoot and adapted to a box stock gun. What we are talking about here is going back to a much more normal head and body position allowing us to be more flexible and comfortable. We are also talking about our vision. The eye can do a much better job for us if our head is level and we are looking straight ahead. We are talking about adapting the gun to us instead of us adapting to the gun.